A single bowl of pho can take anywhere from 6 to 24 hours to make — and most of that time comes down to one thing: getting the broth right. That rich, clear, aromatic broth you love at your favorite Vietnamese restaurant isn’t the result of some mysterious magic. It’s the result of very specific temperatures held for very specific amounts of time.
Here’s what most home cooks get wrong: they either boil the broth too hard (and end up with a cloudy, greasy mess) or they don’t cook the bones long enough (and end up with thin, flavorless water). The difference between a forgettable bowl and one that makes you close your eyes and exhale? It’s temperature control, and a handful of techniques that Vietnamese grandmothers have perfected over generations.
This guide breaks down the entire process — from prepping bones to ladling the final bowl — with exact temperatures and practical methods you can actually follow in a home kitchen.
Understanding Pho: Why Temperature Is Everything
Pho (pronounced “fuh”) is a Vietnamese soup that traditionally features a slow-simmered bone broth, rice noodles, thinly sliced meat, and a pile of fresh herbs and garnishes. There are two main types: pho bo (beef pho) and pho ga (chicken pho). Beef pho is the more classic, labor-intensive version, and that’s what we’ll focus on here — though the temperature principles apply to both.
The broth is the soul of the dish. And broth is, at its core, a chemistry experiment. You’re extracting collagen from bones, rendering fat, dissolving minerals, and coaxing flavor from charred aromatics and toasted spices. Every one of those processes is temperature-dependent.
Go too hot, and you emulsify the fat into the liquid, making it cloudy and heavy. Stay too cool, and you won’t extract enough collagen, leaving the broth thin and lacking that silky body. The sweet spot? It’s narrower than you’d think.
Choosing and Preparing the Bones
The foundation of great pho broth starts long before anything touches a pot. Your bone selection matters enormously.
For beef pho, you want a mix of marrow bones (cut into 2–3 inch pieces) and knuckle bones. Marrow bones deliver richness and fat. Knuckle bones are loaded with collagen and connective tissue, which gives the broth that slightly viscous, mouth-coating quality. A good ratio is roughly 3 pounds of knuckle bones to 2 pounds of marrow bones for every 6 quarts of water.
Some cooks also add an oxtail or a piece of beef brisket or chuck to the pot. The meat serves double duty — it flavors the broth while cooking, and you pull it out later to slice and serve in the bowls. If you’re going this route, a 1 to 1.5 pound piece of brisket works well.
Pro Tip: Ask your butcher to cut the leg bones for you. Cross-cut marrow bones expose more surface area, which means faster and better extraction.
The Blanching Step (Parboiling)
Before any real cooking begins, you need to blanch the bones. This step removes impurities — blood, bone fragments, and proteins that would otherwise cloud your broth and create an unpleasant scummy layer.
Place the bones in a large stockpot and cover them with cold water. Bring the water to a rolling boil (212°F / 100°C) and let the bones boil aggressively for about 10 to 15 minutes. You’ll see a thick gray foam rising to the surface. That’s exactly what you want to get rid of.
Drain the pot completely. Rinse each bone under running water, scrubbing off any clinging residue. Rinse out the pot too. This might feel wasteful, but it’s the single most important step for achieving a clear broth. Skip it, and no amount of skimming later will save you.
Charring the Aromatics: Building the Flavor Base
While pho broth gets its body from bones, it gets its distinctive aroma from charred onions, ginger, and a specific set of whole spices. The charring technique is non-negotiable — it adds a smoky sweetness that raw aromatics simply can’t provide.
Take 2 large onions (halved, skin on) and a 4-inch piece of ginger (halved lengthwise). You have a few options for charring them.
The most traditional method is holding them directly over an open gas flame using tongs until the surfaces are deeply blackened and blistered — about 3 to 4 minutes per side. If you don’t have a gas stove, your broiler works great. Place the aromatics on a sheet pan about 4 inches from the broiler element, set to high (around 500°F / 260°C), and char them for about 5 to 7 minutes per side.
You’re looking for genuine blackening here, not just browning. The carbonization creates flavor compounds — specifically Maillard reaction products and caramelized sugars — that give pho its signature depth.
After charring, rinse the onions and ginger under water to remove the loose charred skin. Don’t scrub too hard. You want some of that char left behind.
Toasting the Spices
Pho’s spice profile is subtle but essential. The traditional spices are star anise (4–5 whole pods), cinnamon (one stick, preferably Vietnamese/Saigon cinnamon), whole cloves (4–5), coriander seeds (1 tablespoon), and optionally fennel seeds (1 teaspoon) and green cardamom (2–3 pods).
Toast these in a dry skillet over medium heat (around 325°F / 163°C) for 2 to 3 minutes, shaking the pan frequently. You’ll know they’re ready when they become fragrant and the coriander seeds darken slightly. Be careful — spices go from toasted to burned very quickly. Burned spices taste bitter and acrid, and there’s no fixing that.
Tie the toasted spices in a cheesecloth pouch or put them in a mesh tea ball. This makes them easy to remove later. Leaving loose spices floating in the broth makes straining more difficult and risks over-extraction, which can turn the broth medicinal-tasting.
The Simmer: Where Patience Meets Precision
This is where the real work happens — and by “work,” I mostly mean waiting. The broth needs to simmer for a long time at a very specific temperature range.
Place your blanched, cleaned bones back in the stockpot. Add the charred onion and ginger, your spice pouch, and enough cold water to cover the bones by about 2 inches (usually 5 to 6 quarts). Starting with cold water matters. It allows the proteins to dissolve gradually rather than seize up immediately, which contributes to clarity.
Bring the pot to a boil over high heat. Once it reaches 212°F (100°C) and starts rolling, immediately reduce the heat.
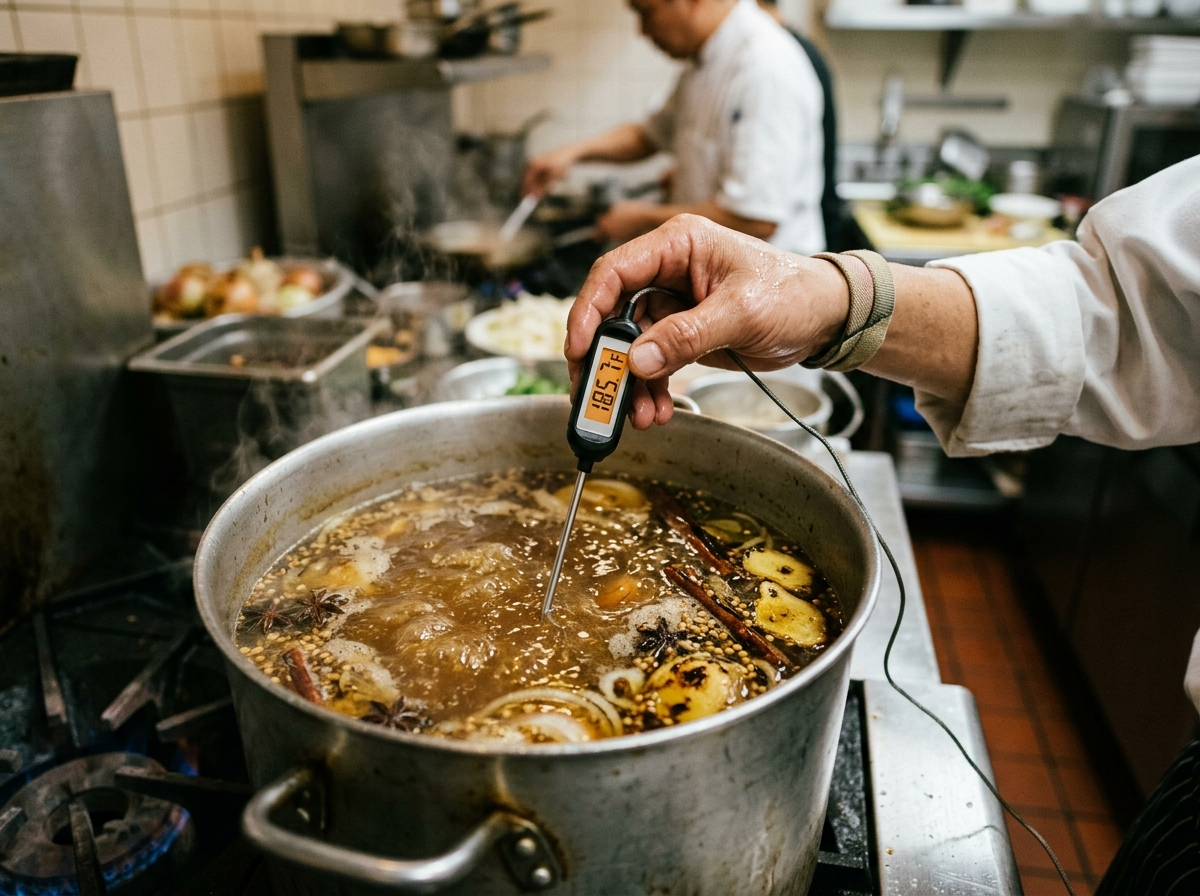
Here’s the number you need to remember: between 190°F and 200°F (88–93°C).
That’s your target range for the entire simmer. At this temperature, you’ll see small bubbles lazily rising to the surface — maybe one or two per second. The French call this a “lazy simmer,” and it’s exactly what you want. The surface of the liquid should shimmer and gently move, but it should never churn or roll.
Why This Specific Temperature Range?
At 190–200°F, collagen in the bones slowly converts to gelatin, which dissolves into the liquid and gives the broth body. Fat renders gently and floats to the surface in clear pools where you can easily skim it off.
If you push the temperature above 212°F into a full boil, the turbulence emulsifies the fat into the broth. That emulsification is what creates a cloudy, murky appearance. It also distributes the fat throughout the liquid in tiny droplets that coat your palate in a heavy, greasy way rather than delivering clean flavor.
Below 185°F (85°C), collagen extraction slows dramatically. You’d need to extend your cook time significantly, and you still might not achieve the same richness.
An instant-read thermometer or a probe thermometer clipped to the side of the pot is genuinely helpful here. Don’t guess. Temperature is the difference between a broth that’s restaurant-worthy and one that’s just okay. If you’re serious about getting your cooking temps right across different dishes, something like knowing the right internal temperature for proteins like shrimp shows how much precision matters.
How Long to Simmer
For beef pho, plan on at least 6 hours of simmering. Many traditional recipes call for 8 to 12 hours, and some pho restaurants in Vietnam and across the U.S. keep their pots going for 24 hours or more.
Here’s a rough timeline that works well for home cooks:
Hours 1–3: The broth starts developing color and a light beefy aroma. Most of the fat will render during this phase. Skim the fat and any remaining scum from the surface every 30 to 45 minutes. Consistent skimming is one of the biggest differences between amateur and professional broth.
Hours 3–6: The collagen extraction kicks into high gear. The broth will start to feel slightly tacky on your lips if you taste a spoonful. The color deepens to a warm amber-gold.
Hours 6–8 (and beyond): The broth reaches full body. The flavor concentrates, and the gelatin content reaches a level where the broth will jiggle like Jell-O if you refrigerate it. That jiggle is a sign of success.
If you’re adding brisket or chuck to serve in the bowls, put the meat in around hour 1 and remove it when it’s fork-tender — usually after about 90 minutes to 2 hours, depending on thickness. Set the meat aside to cool, then slice it thinly against the grain right before serving.
Did You Know? Traditional pho shops in Hanoi and Ho Chi Minh City often maintain a “master broth” — a pot that’s continuously simmered and replenished with new bones and water daily. Some of these master stocks have been going for years, developing a complexity that no single batch can match.
Seasoning the Broth: Getting the Balance Right
Once your broth has simmered for the desired time, it’s time to season it. Remove the bones, aromatics, and spice pouch. Strain the broth through a fine-mesh sieve lined with cheesecloth into a clean pot.
The three key seasonings are fish sauce, rock sugar (or regular sugar), and salt. The balance between these three is what separates good pho from great pho.
Start with about 3 tablespoons of fish sauce and 1 tablespoon of rock sugar for 4 quarts of broth. Taste. Add more gradually. The fish sauce provides umami depth and salinity. The sugar doesn’t make the broth sweet — it rounds out the flavors and softens any harsh edges.
Rock sugar (also called yellow rock sugar or lump sugar) dissolves more slowly and has a cleaner sweetness than granulated sugar. You can find it at any Asian grocery store, usually near the spices or in the baking aisle.
Warning: Go easy on the fish sauce at first. It’s potent. You can always add more, but you can’t take it out. If your broth tastes flat, it probably needs more fish sauce. If it tastes sharp or overly salty, add a touch more sugar.
Some cooks add a splash of Chinese cooking wine to their pho broth for an extra layer of depth. It’s not traditional, but a tablespoon or two of Shaoxing wine during the last hour of simmering can add a subtle warmth that complements the spice profile nicely.
Preparing the Noodles and Toppings
While your broth is the star, the supporting cast matters too.
Rice Noodles (Banh Pho)
Pho uses flat rice noodles, typically about 3mm wide (labeled “medium” on most packages). Dried noodles are the standard for home cooking, though fresh noodles are available at some Asian markets.
For dried noodles, soak them in room temperature water for 30 minutes before cooking. This pre-soaking lets them hydrate gently without turning mushy. When you’re ready to serve, drop the soaked noodles into a pot of boiling water (212°F / 100°C) for just 30 to 60 seconds. That’s it. They should be pliable and soft but still have a slight chew. Over-cooked noodles turn into paste, and they’ll continue to soften in the hot broth.
If you’re using fresh rice noodles, just blanch them for 10 to 15 seconds to warm them through.
Slicing the Meat
For beef pho, you’ll typically serve two types of meat. The first is the cooked brisket or chuck you simmered in the broth — slice it thinly against the grain while it’s cold or at room temperature (it slices cleaner that way).
The second is raw eye of round or sirloin, sliced paper-thin. This is the meat that cooks directly in the bowl when you ladle the boiling broth over it. To get those ultra-thin slices, pop the beef in the freezer for about 30 to 45 minutes until it’s firm but not frozen solid. A sharp knife does the rest. You want the slices thin enough that the broth, served at the right temperature, cooks them within seconds.
Pro Tip: The broth needs to be at a full rolling boil (212°F / 100°C) when you ladle it over the raw beef. If the broth is just warm, the raw meat won’t cook properly. This isn’t just a texture issue — it’s a food safety concern. You can draw a parallel here to knowing when your proteins are done cooking; the visual cues matter just as much as temperature.
Assembling the Perfect Bowl
Assembly is where everything comes together, and there’s a specific order that produces the best results.
Start with a large, deep bowl — pho bowls are typically 8 to 9 inches in diameter. Place a portion of drained noodles in the bottom. Arrange slices of cooked brisket and raw eye of round on top of the noodles. Add a few thin slices of white onion and a scattering of chopped scallions and fresh cilantro.
Now bring your strained, seasoned broth back to a vigorous boil (212°F / 100°C). Ladle it directly over the raw beef and noodles. Pour generously — the bowl should be about two-thirds full of broth. You’ll see the raw beef change from red to gray-pink almost instantly. Give it about 30 seconds. By the time you carry the bowl to the table, the residual heat will have cooked the meat through.
The garnish plate is where pho really becomes personal. Set out a plate with Thai basil (not regular basil — the flavor is completely different), bean sprouts, lime wedges, sliced jalapeño or Thai chili, and hoisin sauce and Sriracha on the side. Everyone customizes their own bowl, which is half the fun.
If you enjoy building flavor-packed Asian bowls, the approach is similar to putting together a solid teriyaki chicken bowl — it’s all about layering components in the right order.
Chicken Pho (Pho Ga): A Faster Alternative
Not everyone has 8 hours to devote to beef bones, and that’s where chicken pho comes in. It’s lighter, faster, and honestly just as satisfying on a different level.
Use a whole chicken (about 3.5 to 4 pounds) or a mix of bone-in thighs and a carcass. The charred aromatics and spice blend remain the same as beef pho, though you can reduce the star anise slightly since chicken is more delicate.
The simmer temperature is identical — 190–200°F (88–93°C) — but the total time drops dramatically. Chicken bones have less collagen than beef, so you’ll reach good flavor extraction in 1.5 to 2 hours. If you’re simmering a whole chicken, pull it out after about 45 minutes to an hour (or when the thigh registers 165°F / 74°C internally). Let it cool, then shred the meat for the bowls and return the bones to the pot to continue simmering.
The resulting broth is golden, clean, and aromatic. Season it the same way — fish sauce, rock sugar, salt. Some cooks prefer a lighter hand with the seasoning to let the chicken flavor shine through.
The Instant Pot and Pressure Cooker Approach
Look, purists will scoff at this. But if it’s Tuesday night and you want pho and you don’t have 8 hours, a pressure cooker can deliver surprisingly good results.
The magic of a pressure cooker is that it raises the boiling point of water. At 15 psi of pressure, water boils at roughly 250°F (121°C), which dramatically accelerates collagen extraction.
You’ll still want to blanch and rinse your bones first (some things you just can’t shortcut). Char your aromatics. Toast your spices. Then pressure cook the bones on high for 60 to 90 minutes with a natural release.
Is it as good as an 8-hour simmer? Honestly, no. The flavor is slightly less developed, and the broth can be a touch cloudier because the aggressive pressure creates more turbulence. But it’s about 80% of the way there, and for a weeknight dinner, that’s more than enough.
Storing and Reheating Pho Broth
If you’re going through the effort of making pho broth from scratch, make a big batch. It stores beautifully.
Let the strained broth cool to room temperature, then refrigerate it. Within a few hours, the fat will solidify on top into a white cap. That fat layer actually seals and preserves the broth underneath. You can peel it off before reheating (or leave some for richness).
In the refrigerator, pho broth keeps for 4 to 5 days. If it has high gelatin content (which it should), it’ll set up like jelly — that’s a great sign.
For longer storage, freeze it in quart-sized containers or zip-lock bags laid flat. Frozen pho broth lasts 3 to 4 months without significant quality loss. The key rules for storing cooked items — similar to how long cooked items stay good in the fridge — always apply: cool it quickly, store it properly, and trust your nose if something seems off.
When reheating, bring the broth to a full boil (212°F / 100°C) before ladling. This isn’t just for flavor — you need that temperature to cook the raw beef in the bowl and to properly heat the noodles.
Common Mistakes and How to Avoid Them
Boiling the broth too hard is the number one mistake. Once you hit a rolling boil and your bones are in, turn that heat down. A gentle simmer, not a jacuzzi.
Skipping the blanching step is the number two mistake. Those 15 minutes of parboiling and rinsing save you from a cloudy, scummy broth that no amount of skimming can fix.
Over-spicing is more common than under-spicing. Star anise and cloves are potent. If you leave them in too long, they overpower everything else. Pull out the spice pouch after about 45 minutes to an hour, then taste. You can always put it back for a bit if the spice level is too subtle.
Using the wrong noodles happens more than you’d think. Don’t use pad Thai noodles (too wide), vermicelli (too thin), or egg noodles (wrong texture entirely). Look for packages labeled “banh pho” or “rice sticks” in the 3mm width. If you’ve ever worked with ramen noodles for dishes like ajitsuke kikurage ramen, you know that noodle choice can make or break an Asian soup.
Not heating the broth hot enough for assembly leaves you with under-cooked raw beef sitting in lukewarm liquid. Bring it to a full, vigorous boil right before you ladle.
FAQ
What temperature should pho broth simmer at?
Keep your pho broth between 190°F and 200°F (88–93°C) throughout the entire simmering process. You’ll see gentle, lazy bubbles breaking the surface — not a rolling boil. This temperature range extracts maximum collagen and flavor from the bones while keeping the broth clear and clean. Use a probe thermometer clipped to the pot if you’re unsure.
How long does it take to make pho from scratch?
Beef pho typically requires 6 to 12 hours of simmering time, plus about an hour of prep (blanching bones, charring aromatics, toasting spices). Chicken pho is faster, needing only 1.5 to 2 hours of simmering. If you use a pressure cooker, you can reduce beef pho broth time to about 60 to 90 minutes, though the flavor won’t be quite as deep.
Can I make pho broth the day before?
Yes, and honestly, it’s even better that way. Making the broth a day ahead lets you refrigerate it overnight. The fat solidifies on top for easy removal, and the gelatin sets, which actually helps the flavors meld. Just bring the broth to a full boil (212°F / 100°C) before serving the next day.
Why is my pho broth cloudy?
Cloudy broth almost always comes from boiling too aggressively. High heat emulsifies the fat into the liquid and suspends protein particles that make it murky. The fixes are: blanch and rinse your bones thoroughly before simmering, maintain a gentle simmer (not a boil), and skim fat and foam from the surface regularly during the first few hours.
What cut of beef is best for pho?
For serving in the bowl, eye of round is the classic choice for raw beef slices — it’s lean, tender when sliced thin, and cooks beautifully in the hot broth. For the simmered meat, brisket (flat cut) and beef chuck are both excellent. For the broth itself, you want knuckle bones (for collagen) and marrow bones (for richness), ideally from a butcher who can cut them for you.
Your Next Bowl Starts Now
Making pho at home is a project — there’s no getting around that. It asks for time, attention, and a willingness to stand at the stove skimming foam at regular intervals. But it rewards you with something most restaurants struggle to match: a broth that’s been tuned exactly to your taste, simmered in your kitchen, poured into bowls for people you care about.
Start with the bones and the temperature. Get those right — 190 to 200°F, held steady for hours — and everything else falls into place. Char your aromatics until they’re legitimately blackened. Toast your spices just until fragrant. Season with restraint. And when it’s time to assemble, make sure that broth is screaming hot.
Your first batch might not be perfect. Your second will be closer. And somewhere around your third or fourth attempt, you’ll ladle a bowl, taste the broth, and realize you’ve made something genuinely special. That’s the moment that makes all those hours worth it.