Most people don’t struggle with oysters because they’re weak. They struggle because they’re pushing in the wrong spot. If you want to learn how to open an oyster without cutting your hand, cracking the shell into the meat, or dumping out that salty liquor, the fix is simple: better grip, better angle, less force. Once you understand the hinge, shucking gets a lot less mysterious.
Why opening an oyster feels so hard
An oyster is built to stay shut. That’s the whole point.
Its two shells clamp together tightly, and a small but strong adductor muscle holds them closed. So if you’ve ever poked one with a random kitchen knife and thought, “Why won’t this thing open?” — that’s normal. You weren’t fighting bad luck. You were fighting oyster anatomy.
Here’s the part that makes life easier: shucking doesn’t mean smashing the shell open. It means slipping a sturdy knife into the shell at the right spot, popping the hinge, and cutting that muscle cleanly.
Think of the oyster like a little bowl with a lid.
- The flat shell is the lid.
- The deeper shell is the bowl, also called the cup side.
- The goal is to remove the lid while keeping the bowl level so the oyster meat and liquid stay inside.
That liquid has a name too. It’s called oyster liquor. It isn’t just seawater. It’s the oyster’s natural briny liquid, and it carries a lot of the flavor.
Quick fact: If you spill out the liquor, the oyster will still be edible, but it won’t taste as fresh and balanced.
The biggest mistake beginners make? They use brute force. Oyster shucking works better when you treat it like turning a key, not chopping wood.
What you need before you start
You don’t need a fancy seafood station. You do need a safe setup.
Pick fresh oysters first
If you plan to eat oysters raw or lightly dressed, freshness matters even more than technique.
Look for oysters that are:
- Cold
- Closed tightly, or almost closed
- Heavy for their size
- Smelling like the ocean, not fishy or sour
Skip any oyster with a badly cracked shell. If one is gaping open and doesn’t react when handled, don’t trust it.
If you’re buying from a seafood counter, ask when they came in and how they’ve been stored. A good fishmonger won’t act weird about that question. Oysters should stay cold and damp, not sit in warm air or fresh water.
You may also notice different names like Blue Point, Wellfleet, Kumamoto, or Pacific oysters. Shapes vary a lot by type and region. Some are long and narrow. Some are round and deeply cupped. Don’t worry too much about variety for your first try. Just buy fresh ones with a visible hinge and solid shells.
Gather the right tools
A few basic tools make the job much safer:
- Oyster knife
- Thick kitchen towel or cut-resistant glove
- Small scrub brush
- Tray or bowl of ice
- Short paring towel or paper towels for grip and cleanup
An oyster knife matters because it has a short, sturdy blade built for twisting. A regular sharp kitchen knife can slip too easily and cause a nasty hand injury.
Warning: Don’t hold an oyster in your bare palm while pushing with a knife. That’s how people end up bleeding into the sink.
Clean the shell, but don’t soak it
Before you open anything, rinse the oysters briefly under cold running water and scrub off mud, grit, or bits of shell.
Don’t soak them in fresh water.
That can weaken the oyster, mess with its flavor, and shorten the time it stays alive. A quick scrub is enough.
Then keep them cold until you’re ready to shuck. A tray of ice works well.
Pro tip: If the shells feel extra slippery, put them in the freezer for about 10 minutes before opening. That short chill can help with grip. Don’t leave them in long enough to freeze.
If you’re planning a full seafood meal, safe timing matters for the rest of your ingredients too. These guides on how long lobster tails stay in the fridge and how long thawed salmon lasts in the fridge can help you keep the whole spread on track.
How to open an oyster step by step
This is the part you came for. Slow down on your first few oysters. Speed comes later.
Step 1: Hold the oyster the right way
Put the oyster in a folded towel with the cup side down and the flat side up.
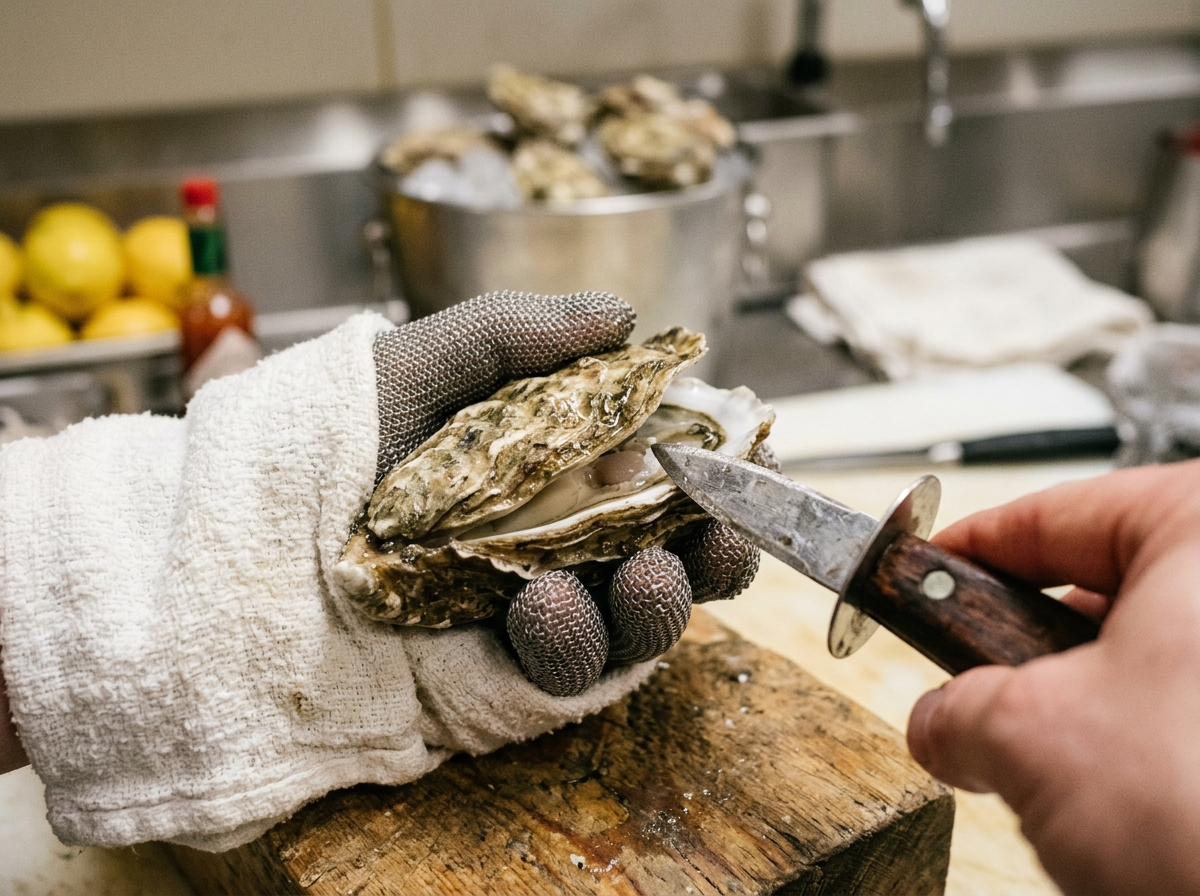
Leave the hinge exposed. Hold the wrapped oyster firmly on a stable surface or in your non-dominant hand if you’re comfortable. Your hand should grip the shell from the sides, never from directly underneath the knife path.
The towel does two jobs. It improves grip, and it protects your hand if the knife slips.
If you’re new, use a towel and a cut-resistant glove. There’s no prize for making this harder.
Step 2: Find the hinge
The hinge is the small joint where the two shells connect. It’s usually at the narrower end of the oyster.
Sometimes it looks obvious. Sometimes it doesn’t.
Run your finger along the seam and look for the point where the shells seem to lock together. That’s your entry point.
A lot of beginner frustration starts here. People attack the side seam or the middle of the shell because it looks easier. It usually isn’t. Start at the hinge if you can.
Step 3: Work the knife tip into the hinge
Take your oyster knife and place the tip into the hinge.
Now use a gentle wiggle and push, not a hard stab.
You’re trying to seat the blade into a tiny gap. A little rocking motion helps. If the knife won’t go in at all, adjust your angle slightly and try again. Sometimes a shift of just a few millimeters changes everything.
If it still won’t budge, don’t get angry and shove harder. Reset your grip. Re-check the hinge. More force often means more slipping.
Step 4: Twist to pop the shell
Once the knife tip is in far enough to hold, twist the handle like you’re turning a key.
You should feel or hear a small pop.
That pop means you’ve loosened the hinge and separated the top and bottom shells. It doesn’t need a dramatic crack. In fact, if you hear a big crunchy snap, you probably broke shell instead of opening the hinge cleanly.
This is the moment where people either fall in love with oyster shucking or start cursing at the counter.
If you got the pop, you’re doing great.
Step 5: Slide the blade under the top shell
After the hinge opens, keep the blade flat against the inside of the top shell and slide it forward.
You’re looking for the muscle that holds the shell shut. Keep the blade hugging the top shell so you don’t stab the oyster meat.
That muscle usually gives a little resistance, then releases. Once it does, lift off the top shell.
If you see small shell fragments, remove them with the tip of the knife or a clean fingertip. Try not to rinse the oyster unless you really need to, because rinsing washes away flavor.
Did you know? The cleanest-looking oyster isn’t always the best-tasting one. A little natural briny liquid in the shell is exactly what you want.
Step 6: Free the oyster from the bottom shell
At this point, the oyster meat is still attached to the bottom shell.
Slide the knife gently under the oyster and cut the lower attachment point. Keep the blade close to the shell so you don’t slice up the meat.
Once it’s loose, turn the oyster slightly so it sits neatly in the shell. That way it looks better and is easy to eat.
Now check for shell bits one last time.
That’s it. You’ve opened the oyster.
Your first one may take a minute or two. The fifth or sixth often takes under 30 seconds. That’s normal. Oyster shucking is one of those kitchen skills that suddenly clicks after a few tries.
What if the oyster still won’t open?
Some oysters are stubborn. If one refuses to cooperate, try these small fixes before giving up:
- Reposition the knife a little closer to the hinge center
- Change the angle of the blade
- Grip the shell tighter with the towel
- Let the oyster chill for a few more minutes
If the shell starts breaking into sharp bits, stop and switch to a fresh oyster. One difficult shell isn’t worth an injury.
Can you open an oyster without an oyster knife?
Short answer? Yes, but I wouldn’t recommend improvising if you want raw oysters.
People ask about butter knives, screwdrivers, table knives, and even microwaves. Can those methods work in a pinch? Sometimes. Are they the safest choice for a beginner? Not really.
A regular kitchen knife is usually too sharp, too thin, or too flexible. That makes slipping more likely. A screwdriver can pry, but it doesn’t cut the muscle well and can crack shells into the meat.
If you want to serve the oyster raw and neatly, a real oyster knife is the best tool. They’re cheap, small, and worth having if you plan to do this more than once.
The safer backup method: use heat
If you don’t have an oyster knife and you just want the oyster open, heat is the easier path.
You can place oysters on a hot grill, in a steamer, or under a broiler just until the shells loosen or pop slightly. Then use tongs and a sturdy tool to pry them open.
That won’t give you a raw oyster experience, of course. The texture changes, and some liquor spills out. Still, it’s a solid option if safety matters more than presentation.
If cooked shellfish sounds more your speed, frozen mussels without shells are another easy shellfish option to keep in mind.
What not to use
Don’t use:
- A flimsy butter knife
- A long chef’s knife
- A knife with a loose handle
- A tool you can’t grip firmly when wet
That’s not being dramatic. Oyster shells are rough, hard, and unpredictable. The wrong tool turns a simple kitchen task into a hand injury fast.
Common mistakes and safety warnings
A lot of bad oyster experiences come from a few very fixable mistakes.
Mistake 1: Forcing the blade straight down
You don’t need to stab into the oyster. You need to sneak into the hinge and twist.
Straight-down force often cracks the shell and drives grit into the meat.
Mistake 2: Holding it in your bare hand
Even confident cooks slip sometimes.
Use a thick towel, a glove, or both. The shell is jagged, the knife is short, and your off-hand is close to the action. Protect it.
Mistake 3: Spilling the liquor
The deeper half of the shell should stay level.
If you tilt it too early, the liquor runs out and you lose a big part of the flavor. Think of the cup side like a tiny soup bowl. Keep it steady.
Mistake 4: Scraping the meat too hard
The knife should ride along the shell, not chop through the oyster.
If your oyster looks shredded, you’re probably using too much pressure or the wrong blade angle.
How to tell if an oyster is bad
Before opening, throw away oysters that are cracked badly or gaping open.
After opening, discard any oyster that has:
- A sour, rotten, or strongly fishy smell
- Dry or shriveled meat
- No real sign of fresh natural liquor
- A strange look that makes you pause for a second and doubt it
Fresh oysters should smell like clean sea air.
Trust your nose here. If it smells bad, don’t argue with it.
Raw oyster safety matters more than fancy plating
Raw oysters can carry harmful bacteria, including Vibrio. Current CDC and FDA food safety guidance still treats raw oysters as a higher-risk food, especially for people who are pregnant or have certain health conditions.
You should skip raw oysters if you have:
- A weakened immune system
- Liver disease
- Diabetes
- Cancer treatment or another serious illness
- Pregnancy-related food safety concerns
A common misconception trips people up here: lemon juice, hot sauce, or alcohol do not make raw oysters safe. They add flavor. They don’t kill all the risky bacteria.
If you want a broader look at raw seafood risk, this guide on eating raw lobster safely gives useful context in plain language.
Medical note: This article is general food information, not medical advice. If you have a health condition and aren’t sure whether raw shellfish is safe for you, ask your doctor.
What to do after you shuck the oyster
You’ve done the hard part. Now don’t ruin it with warm storage or rough handling.
Serving oysters raw
Serve oysters as soon as possible after opening them.
Set them on crushed ice or rock salt so the shells stay level. Add simple extras on the side like lemon wedges, mignonette, or hot sauce. Keep the toppings light if you actually want to taste the oyster.
Before serving, make sure:
- The oyster is fully detached from the bottom shell
- There are no shell shards left
- The liquor is still in the shell
- The oyster smells fresh
If you’re building a cold seafood platter, it also helps to know whether smoked salmon is cooked or raw and what tobiko is, since both often show up beside oysters on seafood boards.
If you change your mind and want them cooked
That’s fine too.
A lot of people love the idea of raw oysters more than the reality. If you open one and decide you’d rather cook it, top it with butter, garlic, or breadcrumbs and broil it for a few minutes until the oyster looks plump and set.
You can also grill oysters in the shell until they open, then finish with sauce.
Cooked oysters lose some of that clean briny snap, but they gain warmth, richness, and a softer texture. There’s no wrong choice there. Your dinner, your rules.
Don’t let them sit around
Once oysters are opened, keep them cold and eat them quickly.
For best quality, serve them the same day. If they sit out at room temperature too long, risk goes up fast. The usual home food-safety rule applies: don’t leave perishable seafood out for more than about 2 hours, or 1 hour if the room is very hot.
If you’re planning seafood ahead of time, timing matters across the board, not just with oysters. That’s why simple storage guides for chilled seafood can save you from guessing later.
- FAQ Section
FAQ
What is the easiest way to open an oyster for beginners?
The easiest way is to use a real oyster knife, a thick towel, and the hinge method. Hold the oyster with the cup side down, insert the knife into the hinge, and twist gently until the shell pops. Beginners do better with patience and grip than with force.
Can you open an oyster without an oyster knife?
Yes, but it’s not the best plan if you want raw oysters. Improvised tools like table knives or screwdrivers can slip or crack the shell. If you don’t have an oyster knife, the safer option is to heat the oyster just until the shell loosens, then pry it open.
Do you wash oysters before opening them?
Yes, but only briefly. Rinse them under cold running water and scrub the outside of the shell to remove dirt and grit. Don’t soak oysters in fresh water, because that can hurt quality and shorten how long they stay alive.
How do you know if an oyster is bad after opening it?
A bad oyster usually smells sour, rotten, or strongly fishy. Fresh oysters should smell like the ocean. If the meat looks dry, shrunken, or just seems off, don’t eat it.
Does lemon juice make raw oysters safe?
No. Lemon juice adds flavor, but it does not reliably kill harmful bacteria in raw oysters. If you need a safer option, cook the oysters instead of relying on acid or hot sauce.
Should oysters be opened right before serving?
Yes, that’s best. Oysters taste freshest right after shucking. Open them close to serving time, keep them cold on ice, and avoid letting them sit out.
- Conclusion
If you want to get good at opening oysters, don’t aim for speed on day one. Aim for one clean oyster. Use a proper knife, protect your hand, keep the cup side level, and let the hinge do the work. Start with half a dozen, not a full party tray. After a few tries, how to open an oyster won’t feel like a chef trick anymore — it’ll just feel like another smart kitchen skill you own.