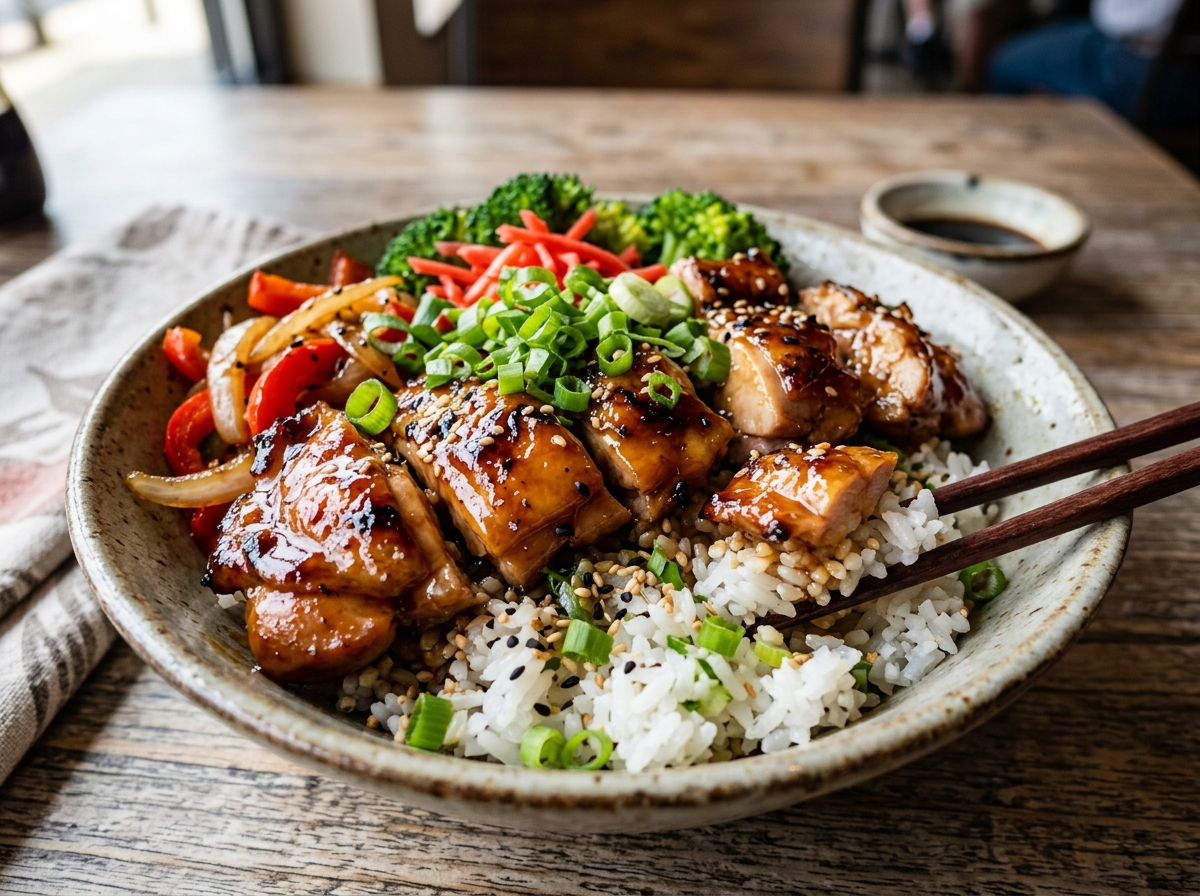
A good teriyaki chicken bowl can fix a bad day. That’s not an exaggeration — there’s something about glossy, caramelized chicken sitting on a bed of warm rice, surrounded by fresh veggies, that just hits different. And yet, most people either order it from a restaurant or settle for a bottled sauce that tastes like sugary water. Here’s the thing: making a real teriyaki chicken bowl at home is easier than you think. You don’t need fancy skills. You don’t need a pantry full of obscure ingredients. You just need about 25 minutes, a hot pan, and a willingness to never go back to takeout again.
This isn’t just a recipe dump. We’re going to talk about what makes teriyaki sauce actually taste like teriyaki, how to get that sticky glaze without burning it, what kind of chicken works best, and how to build a bowl that looks and tastes restaurant-worthy. Whether you’re cooking for yourself on a Tuesday night or feeding a family that’s tired of the same rotation, this one’s going to earn a permanent spot in your kitchen.
What Exactly Is Teriyaki? (It’s Not What You Think)
Most people think teriyaki is a sauce. It’s actually a cooking technique. The word comes from two Japanese words — “teri” meaning luster or shine, and “yaki” meaning grilling or broiling. So teriyaki literally refers to the method of grilling or pan-frying food with a glaze that gives it that signature glossy finish.
The sauce itself? Traditionally, it’s just four ingredients: soy sauce, mirin, sake, and sugar. That’s it. No garlic powder, no ginger paste, no cornstarch slurry. Those came later as the technique traveled from Japan to Hawaii and then mainland America, where it evolved into something a bit different from the original.
When Japanese immigrants settled in Hawaii during the early 20th century, they started using local ingredients like pineapple juice and brown sugar. The American version became sweeter, thicker, and more sauce-heavy. Neither version is wrong — they’re just different expressions of the same idea.
Quick fact: The teriyaki cooking method dates back to the 17th century Edo period in Japan, where it was primarily used for fish, not chicken. Chicken teriyaki as we know it is largely a Japanese-American creation.
Understanding this matters because it changes how you approach making a teriyaki chicken bowl. You’re not just dumping sauce on chicken. You’re building flavor through technique — getting that caramelization, that shine, that balance of sweet and salty and savory.
The Sauce Makes or Breaks Everything
Let’s be honest. A teriyaki chicken bowl is only as good as its sauce. You could nail the rice, perfectly slice your vegetables, and plate everything like a food stylist — but if the sauce is flat, the whole bowl falls apart.
Homemade vs. Store-Bought
Store-bought teriyaki sauce is convenient, sure. But read the label on most bottles, and you’ll find high fructose corn syrup, artificial caramel color, xanthan gum, and a list of preservatives. The flavor profile tends to lean heavily sweet with barely any depth. Kikkoman and Soy Vay are among the better commercial options if you’re in a pinch, but homemade sauce takes about 5 minutes. Five minutes. That’s less time than it takes to find the bottle in your pantry.
The Perfect Homemade Teriyaki Sauce
Here’s what you need for a sauce that actually tastes like it belongs on your chicken:
- 1/2 cup soy sauce (regular, not low-sodium — you need that punch)
- 1/4 cup mirin (sweet rice wine — don’t skip this)
- 2 tablespoons sake (or dry sherry if you can’t find sake)
- 2 tablespoons brown sugar (or honey for a slightly different vibe)
- 1 teaspoon fresh ginger, grated
- 1 clove garlic, minced
- 1 tablespoon cornstarch mixed with 2 tablespoons water (your thickening agent)
Combine everything except the cornstarch slurry in a small saucepan. Bring it to a gentle simmer. Let it cook for 2-3 minutes so the flavors meld. Then stir in the cornstarch mixture and watch it thicken within 30 seconds. Pull it off the heat. Done.
Pro tip: If you want that deeper, more complex flavor you taste at Japanese restaurants, add a small splash of rice vinegar — maybe half a teaspoon. It won’t make the sauce sour. It just rounds out the sweetness and adds a subtle brightness you can’t quite put your finger on.
The mirin is the ingredient most people skip or substitute, and it’s the one that matters most. Mirin gives teriyaki its characteristic sweetness and that glossy sheen. Rice vinegar mixed with sugar isn’t the same thing. If you’re near any Asian grocery store, grab a bottle of hon-mirin (true mirin) rather than “mirin-style seasoning,” which is basically sweetened water with some flavor. If you enjoy cooking Asian dishes regularly — like a good gochujang chicken or a rich char siu pork — mirin will become one of your most-used pantry staples.
Choosing and Prepping the Chicken
Not all chicken is created equal for a teriyaki bowl. Your choice of cut affects cooking time, flavor absorption, and how well the sauce clings to the meat.
Best Cuts for Teriyaki Chicken
Boneless, skinless chicken thighs are the gold standard here. They’ve got more fat than breast meat, which means more flavor and more forgiveness if you overcook by a minute or two. Thighs also have a slightly chewier texture that pairs beautifully with the sticky sauce. Most Japanese and Hawaiian teriyaki restaurants use thighs for exactly this reason.
Chicken breast works too, especially if you’re watching calories or prefer leaner meat. The trick is slicing the breast into thinner pieces — about half an inch thick — so it cooks quickly and doesn’t dry out. Nobody wants a mouthful of dry, chalky chicken drowned in sauce to compensate.
How to Prep
Trim any excess fat from your thighs (a little fat is fine — it adds flavor). Pat the chicken dry with paper towels. This step is non-negotiable. Wet chicken steams instead of searing, and steamed chicken doesn’t get that gorgeous caramelization you’re after.
Season the chicken lightly with salt and pepper. Some people marinate the chicken in teriyaki sauce for 30 minutes to an hour before cooking. Does it help? Honestly, a little. The soy sauce penetrates the surface and seasons the meat more deeply. But if you’re short on time, you can skip the marinade and just cook the chicken with the sauce — the difference isn’t dramatic enough to stress over.
Did you know? Marinating chicken in soy-based sauces for more than 2 hours can actually make the texture mushy. The salt in soy sauce starts breaking down the surface proteins excessively beyond that point. So if you marinate, keep it under 2 hours.
Cooking the Chicken: Getting That Glaze Right
This is where most home cooks go wrong. They either burn the sauce or end up with chicken that’s cooked through but pale and sad-looking. The glaze — that sticky, shiny, slightly caramelized coating — comes from technique, not magic.
The Pan Method (Best for Most Home Cooks)
Heat a large skillet or cast iron pan over medium-high heat. Add a tablespoon of neutral oil — vegetable, canola, or avocado oil all work. Don’t use olive oil here; its smoke point is too low for the sear you want.
Place your chicken thighs (or sliced breast) in the pan. Don’t move them for 3-4 minutes. Let them develop a golden-brown crust on one side. Flip them and cook for another 3-4 minutes.
Now here’s the key move: reduce the heat to medium-low and pour your teriyaki sauce into the pan. Let the chicken simmer in the sauce for about 2 minutes, spooning the sauce over the chicken repeatedly. The sauce will bubble, reduce, and cling to the meat. You’ll see it go from watery to glossy and thick. That’s your teriyaki glaze happening in real time.
Pull the chicken out and let it rest for 2 minutes before slicing. Resting allows the juices to redistribute, so you get moist chicken instead of juices running all over your cutting board.
The Grill Method
If you’ve got a grill going — or want to use one specifically for this — grilling adds a smokiness that’s honestly incredible with teriyaki. Grill the chicken over medium-high direct heat for about 5-6 minutes per side, then brush with teriyaki sauce during the last 2 minutes of cooking. The sugars in the sauce will caramelize over the flame and create an almost candy-like crust.
The sugar in teriyaki sauce burns fast, though. So don’t brush it on too early, and keep the heat controlled. The same principles apply whether you’re grilling chicken for teriyaki or grilling something like sticky Asian wings — sugar-based glazes need attention and timing.
Warning: Don’t use leftover marinade as your finishing glaze unless you boil it first. Raw chicken sat in that marinade. Bringing it to a full boil for at least a minute kills any bacteria, and then you can safely use it as a sauce.
Building the Perfect Bowl
A teriyaki chicken bowl isn’t just chicken on rice. The best bowls have layers of flavor, texture, and color. Think about it as a composed dish where every element plays a role.
The Rice Base
Short-grain Japanese rice (like Koshihikari or Calrose) is your best bet. It’s slightly sticky, which helps it hold together when you eat with chopsticks, and its mild sweetness complements the salty-sweet sauce. Rinse your rice in cold water until the water runs clear — usually 3-4 rinses. This removes excess starch and prevents gummy, clumpy rice.
Cook your rice with the right ratio: 1 cup rice to 1.25 cups water for stovetop, or follow your rice cooker’s instructions. If you’ve got leftover cooked rice sitting in your fridge, that works fine too. Just reheat it with a sprinkle of water and a covered container in the microwave for a minute or two.
Brown rice, jasmine rice, or even cauliflower rice are all acceptable substitutes depending on your dietary preferences. Just know that the classic experience calls for short-grain white rice.
Vegetables and Toppings
This is where you make the bowl your own. The best teriyaki bowls balance something fresh, something cooked, and something with crunch.
Steamed or sautéed options: Broccoli florets, edamame, snap peas, bok choy, or zucchini slices work great. A quick sauté of Korean-style bok choy with garlic and sesame oil is a personal favorite alongside teriyaki chicken — the peppery green balances all that sweetness.
Fresh and crunchy: Shredded carrots, thinly sliced red cabbage, cucumber ribbons, sliced avocado, or pickled radish add color and texture contrast. That crunch against soft rice and tender chicken is what separates a good bowl from a great one.
Finishing touches: A sprinkle of sesame seeds, sliced green onions, a drizzle of sriracha or Japanese mayo (Kewpie), a sheet of nori torn into strips, or a soft-boiled egg cut in half. These little additions take maybe 30 seconds but make the bowl look like it came from a restaurant.
Flavor Variations That Actually Work
Once you’ve nailed the basic teriyaki chicken bowl, there’s a whole world of tweaks you can make without straying too far from what makes it good.
Spicy Teriyaki
Add 1-2 teaspoons of sriracha or gochugaru (Korean red pepper flakes) to your sauce while it simmers. The heat plays beautifully against the sweetness. If you love the balance of sweet and spicy, you already know how well it works in dishes like Korean fire chicken.
Pineapple Teriyaki
This one goes back to the Hawaiian roots of American teriyaki. Add 2 tablespoons of pineapple juice to the sauce and top your bowl with grilled pineapple rings. The acidity of the pineapple cuts through the richness and adds a tropical sweetness that’s surprisingly addictive.
Garlic-Ginger Teriyaki
Double the garlic and ginger in your sauce recipe. Add a splash of Chinese cooking wine instead of sake for a slightly different aromatic quality. The result is punchier and more aromatic — closer to what you’d find at a Chinese-Japanese fusion spot.
Teriyaki With a Miso Twist
Whisk 1 tablespoon of white miso paste into your sauce. Miso adds umami depth that regular teriyaki doesn’t have. It makes the sauce taste more complex, almost meaty, without adding any meat. This variation pairs especially well with mushrooms added to the bowl.
Meal Prep and Storage
One of the best things about a teriyaki chicken bowl is how well it works for meal prep. You can batch-cook everything on Sunday and eat well through Wednesday or Thursday without touching the stove.
How to Store It
Keep the components separate. Rice in one container, chicken in another, fresh veggies in a third. Assembled bowls stored together get soggy — the sauce soaks into the rice, the cucumber goes limp, and everything turns into a mushy mess by day two.
Cooked teriyaki chicken lasts 3-4 days in the fridge in an airtight container. Rice lasts about the same. The sauce can be made ahead and stored in a jar for up to a week. When you’re ready to eat, reheat the chicken and rice, assemble the bowl, and add fresh toppings.
Can You Freeze It?
You can freeze the cooked chicken and sauce together for up to 3 months. Rice freezes decently too — portion it into individual servings, wrap tightly, and freeze. Thaw in the microwave with a damp paper towel over the top to restore moisture. Don’t freeze your fresh veggies, though. Thawed cucumber and avocado are nobody’s friend.
Nutritional Breakdown: What You’re Actually Eating
A homemade teriyaki chicken bowl is surprisingly balanced from a nutritional standpoint — much more so than the restaurant or takeout version, which tends to be heavier on sugar and sodium.
A typical homemade bowl with chicken thighs, white rice, and mixed vegetables comes in around 450-550 calories. You’re looking at roughly 35-40g of protein, 50-60g of carbohydrates (mostly from rice), and 10-15g of fat. The sodium content depends on how heavy-handed you are with soy sauce, but a homemade version typically has 30-40% less sodium than restaurant or bottled sauce versions.
If you’re watching carbs, swap the white rice for cauliflower rice and you’ll drop the carb count to around 15-20g while keeping everything else roughly the same. Using chicken breast instead of thighs cuts about 3-4g of fat per serving.
Pro tip: Japanese restaurants often add extra sugar to their teriyaki sauce to get that thick, candy-like consistency. A single serving of restaurant teriyaki sauce can have 15-20g of added sugar. Your homemade version gives you control over exactly how sweet it is.
Common Mistakes (And How to Avoid Them)
I’ve seen a lot of teriyaki chicken bowls go wrong, and the mistakes are almost always the same. Here’s what trips people up.
Adding the Sauce Too Early
If you pour teriyaki sauce into a screaming hot pan before the chicken has developed a sear, you’re just boiling your chicken in sauce. It won’t caramelize. It won’t get that crust. Sear first, sauce second. Always.
Using Too Much Cornstarch
A little cornstarch thickens the sauce into a beautiful glaze. Too much turns it into a gloppy, starchy paste that coats your mouth unpleasantly. Stick with 1 tablespoon of cornstarch mixed with 2 tablespoons of cold water for roughly half a cup of sauce. You can always add more if it’s not thick enough, but you can’t undo a sauce that looks like wallpaper paste.
Overcrowding the Pan
This is a universal cooking mistake, but it’s especially damaging here. Too much chicken in the pan drops the temperature, releases steam, and prevents browning. Cook in batches if you need to. Give each piece of chicken some breathing room — at least half an inch between pieces.
Skipping the Rest
Slicing into chicken immediately after pulling it from the pan means all those juices run out onto the cutting board. Two minutes of resting makes a noticeable difference. Just set the chicken on a plate, tent it loosely with foil, and use that time to finish assembling your bowl.
Teriyaki Chicken Bowl vs. Other Popular Bowls
If you’re the kind of person who’s always torn between ordering a teriyaki bowl, a poke bowl, or a bibimbap, here’s how they actually compare.
A poke bowl is raw fish-focused, typically built on sushi rice with raw tuna or salmon, fresh vegetables, and a variety of toppings like tobiko or seaweed. It’s lighter, fresher, and usually not cooked.
A bibimbap is a Korean rice bowl with mixed vegetables, a protein (often beef), gochujang sauce, and a fried egg on top. It’s earthy, spicy, and meant to be mixed together before eating.
A teriyaki chicken bowl falls somewhere in between — it’s cooked, warm, sweet-savory, and customizable. It’s arguably the most accessible of the three for picky eaters and kids because the flavor profile is familiar and not too adventurous.
All three are valid. All three are delicious. But the teriyaki chicken bowl has the lowest barrier to entry for home cooking, which is why it’s become such a weeknight staple across American and Asian-fusion kitchens.
FAQ
Is teriyaki sauce the same as soy sauce?
No. Soy sauce is one ingredient in teriyaki sauce, but they’re not interchangeable. Soy sauce is salty and thin. Teriyaki sauce combines soy sauce with mirin, sugar, and sometimes sake to create a sweet, glossy, thicker sauce. Using straight soy sauce on a teriyaki bowl will give you salt without the sweetness and shine that defines teriyaki.
Can I make a teriyaki chicken bowl with an air fryer?
Absolutely. Cook the chicken in the air fryer at 400°F for about 10-12 minutes, flipping halfway through. Brush with teriyaki sauce during the last 2 minutes. The air fryer won’t give you the same pan-glazed finish, but it produces crispy edges that are honestly a pretty great trade-off. Just be careful — the sugars in teriyaki sauce can smoke at high temps, so keep an eye on it.
What can I use instead of mirin?
A mix of dry sherry and a pinch of sugar is the closest substitute. Some people use rice vinegar with sugar, but the flavor isn’t quite right — it’s sharper and lacks mirin’s natural sweetness. Apple juice with a tiny splash of rice vinegar works in an emergency. If you cook Asian food regularly, though, just buy a bottle of mirin. It lasts months in the pantry and shows up in dozens of recipes.
How do I make teriyaki chicken bowl kid-friendly?
Kids tend to love teriyaki because of the sweetness. Make the sauce slightly sweeter by adding an extra teaspoon of honey or brown sugar. Cut the chicken into bite-sized pieces for easier eating. Keep the vegetables simple — steamed broccoli, edamame, and corn are usually safe bets. Skip anything spicy or unfamiliar-looking, and let them drizzle extra sauce if they want.
Is teriyaki chicken bowl gluten-free?
Traditional teriyaki sauce uses soy sauce, which contains wheat. To make it gluten-free, swap regular soy sauce for tamari (a Japanese soy sauce that’s usually wheat-free — check the label to confirm). The rest of the ingredients are naturally gluten-free. Make sure your rice doesn’t have any additives, and you’re good.
Your Next Weeknight Dinner, Sorted
A teriyaki chicken bowl is one of those rare meals that’s fast enough for a busy weeknight, impressive enough for a casual dinner with friends, and satisfying enough that nobody walks away still hungry. Once you’ve made the sauce from scratch — and tasted the difference between real teriyaki and that bottled stuff — there’s really no going back.
Start simple. Chicken thighs, homemade sauce, good rice, a couple of vegetables. Get comfortable with the technique. Then start experimenting — try the spicy version, throw some grilled pineapple on top, or pair it with a ssam sauce on the side for an extra flavor punch. The foundation is solid, so the variations are just fun.
The best part? Your kitchen will smell incredible for hours. And honestly, that alone is worth the 25 minutes.